Look ma, no dependencies!

When building a new app or feature, it can be tempting to immediately start with “import framework” and then build from there. First search for the latest and greatest toolchain, and then get building. It’s best practice, right?

Before we do that, we always first have a look at how much time it would take to write the feature we need. Could we get away without adding another framework with all its dependencies? If the feature seems simple enough, we choose to write a version of it ourselves first.

Using a framework (and libraries to a smaller extent) is always a trade off. There are plenty of examples of both extremes of course. We’ve all seen those websites which load jQuery, Vue, React, Bootstrap and Tailwind, because the entire thing is just dependencies duct taped together. Or introducing a dependency for 11 lines of code, like left pad. On the other hand there are examples of “Not invented here” going so far that products become insecure because they ignore all the hard work done before them (e.g. don’t roll your own crypto, as the advice goes).

The benefits of frameworks are obvious. Everything it already does right you don’t need to work on. And when building an MVP (or feature in any stage of your startup for that matter) you need every minute you can save. So what are the costs we look at? The most obvious is that all those lines of code will eat RAM and CPU (and GPU these days), so if there are large parts you don’t need, that would be wasteful. But there are many other costs too:

  • Learning new concepts. Many frameworks usually lead to a rabbit hole of new concepts you need to explore, very specific to just that framework. Read the docs, explore some tutorials, find out what the “framework way of doing things” is. That includes dependencies on which the framework in turn relies on.
  • Maintenance. You need to keep up with at least security updates, so you need a system in place to learn about those and apply them in time. Ideally you could keep your code running for years and just apply some security updates. But typically the older a dependency gets, the bigger the chance is there won’t be updates for the “old” version, and you need to upgrade to a new version with lots of API changes. So even though your code itself still works perfectly, there’s some bitrot going on, and you need to keep updating your code. You might even have to start over learning new concepts for the new version. Another problem is you need to make sure those (security) updates and in turn all its dependencies can be trusted, which isn’t always easy to do.
  • Unexpected behavior & debugging. With large frameworks there’s always a risk some internal implementation “detail” isn’t really documented well, but is actually important to understand in order for your app to work right. Often you only find this out the hard way after running into a bug. Debugging large frameworks, just like any other codebases you’ve never worked on, can be really time-consuming with deep call stacks and dozens of files.
  • Unknown constraints. Another big risk is finding out half-way that the framework doesn’t really support your use case. Or it simply doesn’t scale.

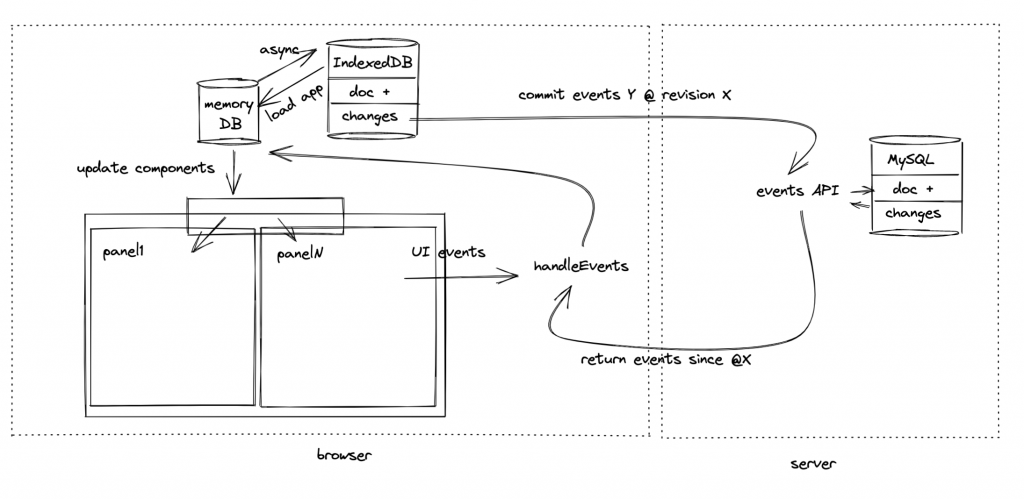
For example, one of the features we’re working on for Thymer is real-time collaboration features using Websockets. Because our backend is Django (a framework which definitely saves us time!), I googled around and found out there’s a project called Django Channels, which extends Django beyond HTTP, including Websockets.

Again, it would sound tempting to simply start there, just import it and done. In this case we would already have to start out with quite a number of new concepts to explore, or new layers we have to add to the stack: ASGI and asgiref, Daphne server, Redis, interfacing with synchronous Django code. Some of those we had never heard of or worked with before. And that’s next to the API of the framework itself, and finding out whether it works for the purpose we need. I’m not at all implying Django Channels isn’t a great framework! The point is that using a framework has a cost, just like writing it yourself does, so we need to compare the two.

So let’s look at what we really need in terms of Websocket functionality. We need to accept connections, keep track of open connections, be able to query the database using Django’s ORM and finally inform open connections when a new event becomes available for them. That’s it. Looking at all this, it’s not completely obvious the integration Django Channels provides with Django is worth the costs (new concepts, add layers to the stack, maintenance, debugging, knowing we don’t run into unknown behavior).

In this case we made the decision to write a simple Websocket script ourselves. It turned out to be around 200 lines of Python3 code and it took 1 day to build.

That would certainly not have been faster when having to look into all the ins and outs of the framework, and even without a deadline of 80 days we’d want to get an MVP out as soon as possible. If we have many customers at some point and it turns out we need something more advanced, then we can still look into rebuilding it (because it’s just 200 lines after all!). And best case 10 years from now this simple script will still be running, happily serving customers, without any modifications. Which is exactly what happened to our websocket script for our first product.

Some database design strategies

Friday Wim wrote about Data and Event Handling on the client side of Thymer.com. Today is about our approach to data storage on the server side. All storage, with very few exceptions, will go directly into a SQL database. MySQL is what we know best, so that’s what we’ll use.

Almost all of our database tables will have at least these columns:

  • “id” (unique auto increment primary key),
  • “guid” (unique, user facing),
  • “group-id” (integer foreign key),
  • “created-at” (datetime),
  • “updated-at” (datetime),
  • “deleted-at” (datetime, nullable),
  • “destroyed-at” (datetime, nullable),
  • “extra_json” (plain text)

I’ll explain briefly what our reasoning is for having these columns.

GUID with unique index + auto-increment int primary key

Having auto-increment primary keys for internal use is convenient, but exposing these keys to the outside world isn’t great. It’s better to use GUIDs in the (JSON) API. Integer primary keys are considerably faster, though, so you can use use both. That’s what we’re doing. A side benefit is that you can use the GUIDs for backup and export/import purposes. You can’t easily import data with auto-increment keys, because you’ll get key collisions, but you don’t have this difficulty when you use GUIDs. They don’t collide by design. If you ever have to shard your service, or want to move data between SQL servers for another reason having GUIDs to work with will save you a great deal of time.

It also makes for much friendlier APIs. You can prefix the GUIDs with the class table it corresponds to. If the wrong kind of GUID is passed to the API, for instance “user_56b2c555-1ccf-4b9a” instead of “project_854a3923-0be9-4106” you can generate a friendly error message that the API function expected a Project instance instead of a User. If you just pass a generic integer you have to return a confusing error message about insufficient permissions because you can’t determine what the API users is trying to do.

Redundant group-id columns

Suppose your product allows groups of users to collaborate and you don’t want to accidently mix up information between groups. You don’t want to put yourself in a situation where users see other people’s data just because you forget a “WHERE” clause in an SQL statement somewhere. Mistakes are unavoidable, but some mistakes are unacceptable and we plan to design our system so the worst kind of mistakes can’t happen. If all tables have a group column (or equivalent) then you can enforce through your ORM that all queries are automatically filtered for access. You can make all database queries go through a single point that ensures a user of Group A can only see data from Group A.

A side benefit of storing redundant group information is that it makes for very easy clean up when people want to close their account. You just go through all database tables and you drop all records for that user/group. If you have to infer which data belongs to which user through foreign keys you can create a difficult situation for yourself. Especially when you need to delete a lot of data you want to be able to do so incrementally. You don’t want your service to become slow (or crash altogether) because a background task locks your database tables.

Multiple datetime columns

Created-at and updated-at speak for themselves. These are timestamps you want to display to the user in some fashion, and they’re too useful not to have. Deleted-at is for soft deletions (tombstones). Sometimes deletion is expensive and you want to just flag many items as deleted first and clean up asynchronously. When the data has actually been destroyed you can use ‘destroyed-at‘. You could delete the actual row from the database, but foreign keys could prevent that. In addition, if you want to show good error messages to users (“this item has been deleted”) it’s helps to keep the row around. Of course, you only need the metadata for this. The columns that contain actual user data you can overwrite when the user wants the data deleted.

If you provide some kind of full text search it helps to have an indexed-at column. You can use this to trigger re-indexing. You can use datetime columns like this for any kind of asynchronous update you want to run. Just select all rows where ‘indexed_at < updated_at‘ and do the necessary processing. Want to re-index a specific group? Just backdate the updated_at column and a background daemon will jump into action. Want to re-index 10 rows that didn’t get processed correctly the first time? It’s trivial. This is much less fragile than having some kind of message queue where you enqueue rows for additional work. A message queue can restart or get out of sync with the main SQL database really easily, but a simple datetime column works every time.

Append-only database tables

Dealing with immutable (meaning: unchanging) state is easy, and gives you version information for free. Being able to show users how their data has changed over time is a useful feature to add and it doesn’t cost anything. It’s just a matter of selecting the most recent row to get the most current data.

Storage is cheap and database engines can deal with large tables just fine. You can always fix performance problems when (and if!) they happen.

A surprise benefit is that caches automatically get invalidated if you use append-only strategies. You can’t have stale cashes for data that doesn’t exist yet. That’s a nice thing to get for free. (Assuming your app is read-heavy. For write-heavy apps this might actually be a disadvantage, because your cashes get invalidated prematurely.)

Multiple queries instead instead of complex queries

When you use an ORM to build your database queries you’ll get pretty naive queries by default. The ORM will happily select much more data than needed, or do thousands of small queries when one will do (see: N+1 problem). When you save objects most ORMs save the entire object back into the database, and not just the single property you’ve changed. ORMs aren’t sophisticated tools by any stretch of the imagination.

ORMs are really great at generating the most basic SQL queries, and we’ve learned that if you can rework your problem as a sequence of very basic queries you don’t end up fighting your ORM. I’ll give an example.

Suppose you want to generate a list of the 20 most popular books written by any of the top 3 most most popular authors. In Django ORM pseudocode:

popular_authors_ids = Books.sort(most_popular).limit(3).author_ids_only()
books_by_popular_authors = Books.filter(author__id__in=popular_authors_ids).sort(most_popular).limit(20)

The example is a bit contrived, but I hope it illustrates the point. By first selecting a bunch of ids that you need for the second query you end up with two very simple (and fast) database queries. Modern SQL databases are extremely powerful, and you can accomplish almost anything in a single query. But by splitting the work up in multiple queries you get three main benefits:

1) you know your ORM is going to generate reasonable SQL
2) you often get extra opportunities for caching the intermediate results
3) you can do additional filtering in Python, Ruby, NodeJS before you make another round-trip to the database to get your final results. This is often faster and easier than doing the same in SQL. Unicode handling in your database and in your target language are always going to subtly different, same with regular expressions. You’re better off using the database as dumb storage.

Extra JSON column

There are plenty of situations where you want to tag a couple of rows for whatever reason. Maybe you’re experimenting with a new feature. Maybe you need temporary storage for a migration. Maybe you need some logging for a hard to replicate bug. Being able to quickly serialize some metadata without having to add an extra column to a database is a big time-saver. You don’t even need to use the JSON serialization functionality in your database for this to be useful. Just being able to store a BLOB of data is where the real value is at.

Data & event handling in the app

As we continue working on the app, one of the decisions in building Thymer is how the data will flow through the app. Let’s look at some more technical details about all the event and data handling considerations.

Server communication

Because Thymer will work like an editor of sorts, it needs to feel like one you might have on your laptop, even though it can run in the browser. That means interactions with the app should be pretty much instant from the perspective of the user. When a user adds or removes text, we don’t have time to ask the server to do the rendering for us. Even if the server would be fast, when every millisecond to render something on the screen counts, that pesky speed of light limit alone would make a round-trip to the server too slow.

That means we need to do all the rendering in the app itself, and send data between the client and server in the background. All the rendering we do is optimistic, meaning it assumes that at some point we’ll be able to communicate it to the server, but it doesn’t matter when.

Data types

The main data type in Thymer is called a “line” for now. It’s like a line in a text document, except lines in Thymer can have all kinds of additional metadata. For example, we will support different “types” of lines, like a heading, a todo, a comment (and perhaps later on things like files or drawings or whatever else we want). Lines can also contain other information, such as references to other lines, tags, and they can be “scheduled”, have due dates and so on.

Lines can also have a parent line, so we can allow features to work on a tree structure, such as zooming in at a section of the document, or collapsing/expanding sections. A document is a list of lines in a certain order.

Next to the data itself, we store the changes on the “document”, called events. An event can be something like creating a line, editing a line, and so on. Although we store the latest version of the “document”, if you would replay all events from the beginning to the end, you would get to the same document.

A copy of all the data

In order to make the app feel instant, it’s important that we store a local copy of the “document” on the client. If something like scrolling down in your document or opening a schedule for next week would result in a delay while waiting from the server, that would not be a good editing experience. In addition, unlike text, it’s possible to link to other parts of the document, so those parts need to be loaded too.

In order to store a local copy of the document, we use the browser’s built-in database, called IndexedDB. Unfortunately, IndexedDB is rather slow, so we also keep an in-memory cache and try to do as few updates to the IndexedDB as possible.

An extra advantage of storing the document like this is that we will be able to easily make the app work offline as well, so you can keep working with Thymer while on the road (in the air).

Because almost all functionality will be client-side anyway, we could even look into something like end-to-end encryption, but we might not have time for that for the first version.

Collaboration

Another factor to consider is that we need the app to be collaborative. That means that not only should we send our own events to the server, but also listen to incoming changes the server sends us. For this part we use websockets. Whenever the user makes any changes, we’ll tell the server about it, which will then tell other clients which are online.

To sync with the server, we send our changes and request the server to send us changes from other clients. We’ll go into the exact algorithm and data types to do this in some other post, but in the end we end up with a list of “events” which we should apply to the document we have stored locally.

UI components

Another reason we have to think about “collaboration” is that even when someone uses Thymer by themselves, things still need to work if you have multiple browser tabs open. And even if that wouldn’t be necessary, then the point of the app is to have features popular in IDEs, such as split-panel views.

That means that when you make a change somewhere in the document, it’s possible that that same section of the document is also visible in another panel, and would need to be updated there as well. From the other panel’s point of view, the change might have come from anywhere, but we need to re-render the line so it’s updated. That means the events need to be handled by all components in the UI.

Combining it all

Because changes can come from multiple sources, multiple parts of the app might have to be updated because of a change, and simply rendering everything to the browser’s DOM would never be fast enough, we use a simple event system in which data always flows in the same direction.

That way, when we make a change somewhere, we don’t have to think about which of a dozen things we need to update one by one. Instead, we create an event, and send it to the root of the app, which sends it to all visible components which can then update themselves. For performance reasons, we take one shortcut in the editor itself: it will immediately respond by drawing the change, after which it will create an event which will inform other components.

As an example, when we paste “hello world” on an empty line:

  • The editor will immediately draw ‘hello world’ to the line’s DOM node
  • The editor panel will create an “update line” event, which is dispatched when the browser has time. We’ll experiment a bit with the best heuristic for performance. This could either be a timeout, or browser callbacks like requestIdleCallback. Using a timeout, we can replace multiple events happening in a short time with one single event (so we can combine individual keystrokes in quick succession to one update event)
  • When the “update line” is dispatched, the app will update the local database (in-memory, and make an asynchronous request to add the change to IndexedDB), and queue the event to be sent to the server
  • Each component in the app for which the “update line” event is relevant receives the event, updates its local state and redraws a part of the screen.
  • After a while, the event is sent to the server. Any new event which is received as a reply follows the same flow and all components will self-update.

Text-based user interfaces in 2022

Although we haven’t done much marketing for Thymer.com yet, we are getting a steady trickle of new email signups for the private beta. It doesn’t prove that we’re on the right track with Thymer, but it suggests that that there are at least some people who want to try an app that looks something like this:

The big trend in web design in the last decade has been towards simplicity: bigger fonts, more whitespace, more visuals, mobile first, and fewer buttons. With Thymer we are heading in the opposite direction. Thymer is keyboard focused, information dense, programmable, and feature rich.

I get why the trend is towards the simplest possible apps. Simple apps are easy to make and easy to support. And the world is huge so there is always demand for apps that get the basics right. Apps like these can look brilliant during the first 30 minutes, and then you run into the first limitation. Soon after into the second one. Then you wish that you could see more of your stuff, but you can’t. These apps are made primarily for mobile devices and on a big screen you just get more whitespace. You want to do some bulk actions, but that’s unwieldy or impossible. Even productivity apps have followed the trend where usability is sacrificed for visual appeal. It makes perfect sense, though, because it’s screenshots that sell your app, and dense apps look intimidating.

We’re taking a big risk by running counter to the trend. We know that there are many programmers who love apps that look like Thymer. The runaway successes of Sublime Text and VSCode are proof of that. Our hope, still unsubstantiated, is that there is a much larger group of people out there — not just programmers — who want a productivity/planning app that’s designed like an IDE. People who aren’t familiar yet with something like a Command Palette, but who are willing to try something new.

Design trends change. First skeuomorphism was cool, then flat design was the only game in town. Maybe, in the future people will demand apps that are simple on the surface but not at the expense of functionality. A new trend towards text-first interfaces for applications that are mainly about text, perhaps.


We’re deep into code now. A good deal of plumbing left to finish before we have something that resembles a buggy prototype. Then we finally have something substantial to show people and then we can ask people on the beta email list and here on 80daystartup what they think and what kind of features they would like to see. For me this is one of the most exciting parts of building a new product. Ideas that started as sketches on napkins and pizza boxes slowly start to take shape.

An update on the coding work

Where we spent a lot of time on the idea, mock screenshots, landing page, and first prototypes in the first weeks, we’ve now been working a lot on the code for the actual Thymer app again the past week. So as a quick status update on the work we’ve been doing, let’s have a look at the different parts of the code base so far.

We’ve split up the work into two code bases for now, so we both work on a different app in a sense, and then plan to merge the code bases sometime soon.

The idea is that we can both continue work on the prototypes we’ve started earlier, and build out all the functionality for those parts as quickly as possible. Because we don’t need to coordinate all the small decisions on our own part of the code this part is going relatively fast so far. And our development set-up helps too.

As both code bases get more and more functionality, at some point we will both need the features from other code base to build on, so we shouldn’t postpone the merging too long. We hope we will only need a few large “decision-time meetings” when integrating the parts. We’ll probably first start with a small glue layer and add the smallest amounts of hooks needed in each code base, and then stitch them up in a sense.

A quick look under the hood:

“Diederik’s part” of the code base deals with the editor component. We decided early on that rather than using the browser’s built-in editor functionality (called contenteditable), we’re building our own editor from scratch. Contenteditable isn’t very good nor flexible and we would never be able to create the experience we have in mind for the app. This part of the code base includes things like keyboard input, logic to deal with text position calculations (from cursor coordinates to dealing with unicode emoji graphemes to line wrapping), text formatting and rendering different tags, text selection, cursor movement and so on.

“My part” of the code base deals with the app’s UI and data. This part we’re writing from scratch, too. The UI part includes things like theming, panels, virtual rendering, drag&drop and custom scrollbars. The data layer takes care of event handling, the in-memory database with async IndexedDB storage (for offline use), an API backend server, and real-time collaboration (using websockets and CRDT based data replication between clients and server).

Having worked on large apps together for a while now, how we decide what to work on feels like a very organic process by now. It’s probably part intuition, part having ideas for something and diving in right away and probably part random.

We’ll soon get to the point where we need to go forward with one integrated code base. For example work on indendation in the editor and syncing tree-based data structures can result in a different set of assumptions if we keep the code diverged for too long. The same goes for undo logic, which we’ve written logic for in both parts. Once the code is merged it will also make it easier to make design decisions on the other features.

Once the main architecture of the app is done we can work on the long tail of fixes (in all parts), and work on the other features for the MVP.

We’re planning to do more technical write-ups about the different individual parts as well, but so far we’ve spent most of the time doing some focused coding this week. And of course we don’t have too much time, so we also need to reserve plenty of days for all the marketing ideas. Hopefully some updates there soon as well 😅

Typescript without Typescript

In some ways, Typescript is pretty awesome:

  • Typescript makes Javascript more strongly typed, which means you get to catch silly typos early. This is great.
  • Because of this typing information you can enjoy IDE advantages like autocompletion of object members, jumping to type definitions, or to function call sites. Nifty.
  • You can easily find unused code, and delete it confidently.
  • Refactoring code becomes way easier. Renaming identifiers is trivial, and when you really start to move code around Typescript is a real lifesaver. Those red squiggles turn an hour of tedious and maximum concentration refactoring work into a breezy 10 minute editing session.
  • Type inference means you don’t have to tediously define the type for every variable.

But Typescript is not without downsides:

  • You have to wait for compilation to finish every time you make a trivial change. Annoying on small projects, really annoying for bigger projects.
  • You get bloated Javascript code along with source maps for debugging. Extra layers of complexity that make debugging harder. If you want to debug an exception trace on a release server you now have to debug an ugly Typescript call stack.
  • Typescript includes Classes and Inheritance and other functionality that overlaps with modern ES6 Javascript. The additional features Typescript enables, like Class Interfaces and Enums, aren’t that compelling. The days of IE6 ECMAScript are long behind us. Modern Javascript is everywhere it’s a pretty good language that doesn’t need Typescript extensions.

What if you could get almost all the benefits of Typescript without Typescript? Turns out that you can. The trick? You just enable typescript mode in VSCode for plain ES6 Javascript projects. I just assumed that Typescript would only do typescript-y things for Typescript projects, but that’s not the case!

The trick is to add a jsconfig.json file to your project, that looks something like the one below. The “checkJS” property is the magic one that gets you 90% of Typescript in your ES6 projects. In my case, I’ve also added some extra type libraries like “ES2021” and “ESNext” (I’m not sure you actually need to declare both). Turns out Typescript otherwise doesn’t know functions like Array.at that are already pretty widely supported in browsers.

My jsconfig.json

{
    "compilerOptions": {
        "target": "ES6",
        "checkJs": true,
        // Tells TypeScript to read JS files, as
        // normally they are ignored as source files
        "allowJs": true,
        "lib": ["ES6", "DOM", "ES2021", "ESNext"],
        "alwaysStrict": true,
        // Generate d.ts files
        "declaration": true,
    }
}

The benefits of typescript without typescript, visualized:

A few limitations

  • Sometimes you have to nudge typescript into interpreting types correctly with JSDoc type annotations. You can define nullable types /** @type {MaybeMyClass?} */, type unions, for example if a variable is either a bool or a string: /** @type {boolean|string} */. Usually VSCode will suggest the correct annotation via call site type inference.
  • No template types or other advanced stuff. I don’t think they’re worth much anyway.
  • When Typescript gets in your way you can just ignore it, so really, you get almost all the upside with none of the downside.

In conclusion

Maybe none of this is news to you. In that case, sorry to disappoint. However, if you have never experienced Typescript error checking, refactoring, and navigation tooling in an ordinary and plain Javascript project you’ve got to try it. It doesn’t happen often that a piece of tech turns out to be way better than expected, but this is one of those cases. Typescript without Typescript is amazing and I’m sticking with it.

The advantages of developing in a dev VM with VSCode Remote

Now that we’re both working on a lot of code, need to keep track of versions, and also need to start working on a backend, it’s time to set up our development environment.

Advantages of doing all development in a local VM

All our source code will be stored on our Git server. Locally we both use a development Virtual Machine (VM) running on our laptop/PC, on which we will check out the (mono) source repository. We will use ES6 for the frontend and python3/Django for the backend, but this works pretty much for any stack. Using a local development VM has several advantages:

  • We’ll both have identical set-ups. Diederik uses Windows most of the time, I use a Mac machine. It would become a mess if we tried to work with all kinds of different libraries, packages and framework versions.
  • Easy to create backups and snapshots of the entire VM, or transfer the entire development setup to a different machine (like in case of any coffee accidents).
  • It avoids the mess of having to install packages on our local PCs and resolving conflicts with the OS. For example, the Python version on my macOS is ancient (and even if it wasn’t, it’s probably not the same as on the production server). Trying to override OS defaults and mess with package managers like brew is a mess in practice. It’s slow, breaks things all the time and adds a lot of extra friction to the dev stack.
  • Not only do we avoid local package managers, but also the need for other tools in the stack like Python’s virtualenv. We don’t have different virtualenvs, only the env, which is the same on our VM as on the production server.
  • So not only will the packages be the same between our development environments, they will even be identical to the eventual production server (which we don’t have yet, we will have to set one up later). This way we don’t need anything like a staging server. Except for having virtual hardware, debug credentials and test data, the development VM will mimic the complete CALM production stack.
  • Because of built-in support for remote development in VSCode (which is still local in this case, but on a local VM), all VSCode plugins are going to run with exactly the language and package versions we want. No mess trying to configure Django and Python on macOS with a different OS base install. All plugins will run on the VM, so we’ll also have IntelliSense code completion for all our backend packages and frontend parts in our stack.
  • That also means that we can not only debug issues in the app, but issues in the stack as well, from nginx web server config to websocket performance.

Setting up the VM

I lile to use vagrant to easily create and manage virtual machines (which you can use with different providers such as VMWare or VirtualBox). To set up a new Debian Linux based VM:

# see https://app.vagrantup.com/debian
pc$ vagrant init debian/bullseye64
pc$ vagrant up
pc$ vagrant ssh 
# now you're in the VM!

In the resulting Vagrantfile you can set up port forwarding, so running a Django development server in your VM will be accessible on the host PC.

Because vagrant ssh is slow, you can output the actual config to ssh into your machine using

pc$ vagrant ssh-config

and then store this in ~/.ssh/config (on the local PC), so it looks something like this:

Host devvm
  HostName 127.0.0.1
  User vagrant
  Port 2020
  UserKnownHostsFile /dev/null
  StrictHostKeyChecking no
  PasswordAuthentication no
  IdentityFile /Users/wim/devvm/.vagrant/machines/default/virtualbox/private_key
  IdentitiesOnly yes
  LogLevel FATAL

To make sure we both have the same packages installed on our VMs (and server later on), we usually create Ansible playbooks (or just a simple bash script when it’s a few packages and settings). We also store our infrastructure config in git, but we’ll go into all of that some other time.

For now, we can just use a very short script to install the packages for our stack:

vm$ apt-get install aptitude && aptitude update && aptitude full-upgrade
vm$ aptitude install python3-pip python3-ipython sqlite3 git
vm$ pip install Django==3.2.12

Now we just need to add our git credentials in the VM’s ~/.ssh/config:

Host thegitserver
  HostName thegitserver.example.com
  User gituser
  ForwardAgent yes
  IdentityFile ~/.ssh/mygit_id

and check out the repository on the VMs drive:

vm$ mkdir project && cd project
vm$ git clone ssh://thegitserver/home/gituser/project.git

Remote VSCode

Now that all the packages and sources are on the VM, we can set up VSCode on our local machine to work on our workspace on the VM and run extensions on the VM as well (see VSCode’s Remote Development using SSH).

1- Simply install the Remote – SSH extension:

2- Open the Command Palette, and >ssh should show the option Remote-SSH: Connect to Host.

3- Select that, and it should show the Vagrant’s SSH config we saved in our PC’s ~/.ssh/config earlier under the name devvm.

4- You’ll see we’re now connected to the devvm. Click Open Folder to open the remote workspace, ~/project in our example.

5 – The last step is ensuring all the extensions we need are installed to the VM. Click on the Extensions tab, look for the extensions you want, and click “Install in SSH”

6 – That’s it! In the screenshot you can now see the plugins are installed on the VM, the repository workspace from the VM is opened as our current project, and git integration works out of the box.

We can even use extensions like the Live Server on our ES6 frontend code like before, and run our Django API development server on the VM knowing we have all the correct packages.

More livecoding

After working on some marketing yesterday, it was time for a bit more prototyping of the app today. At this stage we’re not coding the full functionality of the app yet, but we want to check if certain techniques we had in mind work well or if we need to go back to the drawing board even before we begin.

We’ll try a few of these components and meanwhile start working on some design drafts, so we can create some initial mockups + “screenshots” for our landing/marketing page, and collect an initial list of users interested in a private beta/early access.

If you’re interested in some coding and behind-the-scenes, you can find the latest livestream on Twitch (update: now on YouTube):

First (live!) coding: virtual scrolling

Started with a first bit of coding on the app today! We have to discuss exactly what features we want to build over the coming days and weeks, but I thought I’d quickly start with prototyping a small core component to see if that works as expected.

As an experiment I gave coding in a livestream a try, you can watch it below if you’re interested in a glimpse behind the scenes.

Many apps on the web get very slow when you add a lot of items, and as our app should be as fast as an editor, we want to make sure it works great when you’re adding thousands of tasks or ideas. A technique to speed things up when having to show many items is called virtual scrolling, which I tried to start with today. I’ll also write up a more detailed post about how it works later.