DIY javascript error logging

There are many SaaS products out there that help you with javascript error and event logging, but in this blog post I want to make the case for rolling your own solution.

We log 3 types of events: (1) javascript exceptions with stack traces, (2) failed assertions, and (3) general usage/diagnostics information.

Exception handling

We can use a global event handler to log exceptions. This used to be somewhat difficult, but nowadays window.onerror works great. The browser gives you everything you need. Straight from the mozilla docs:

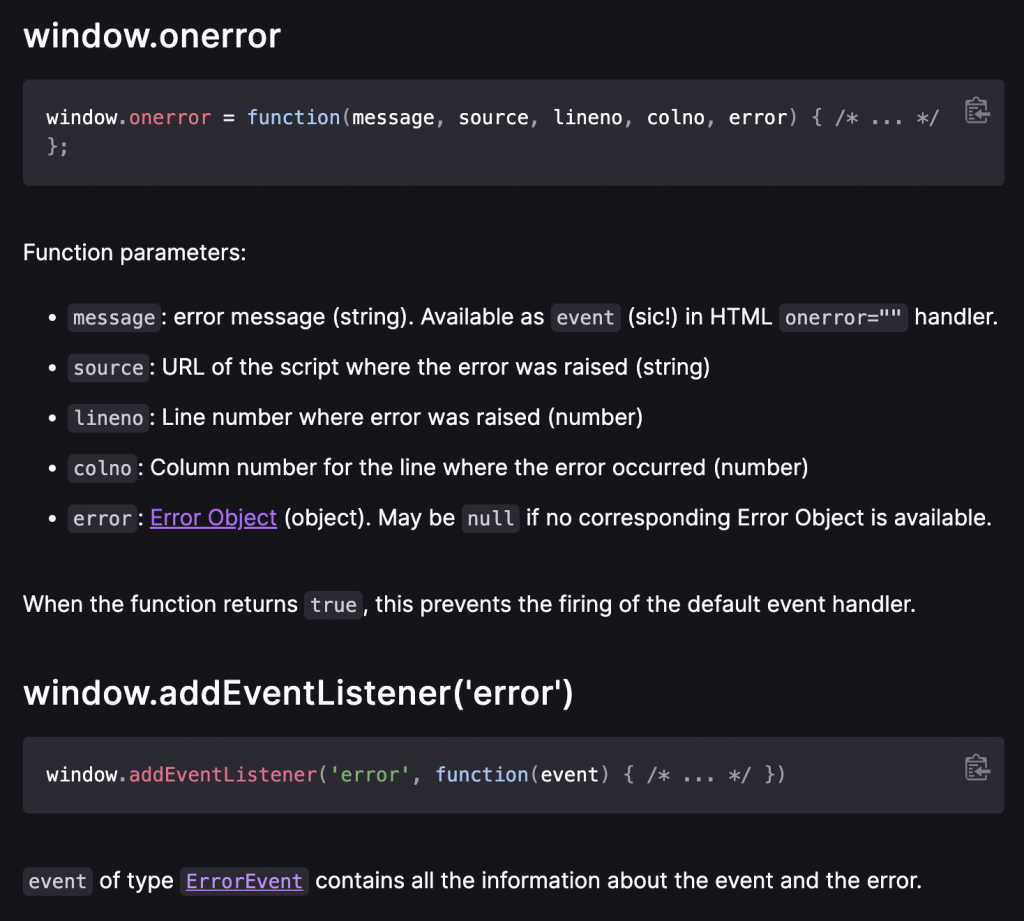
You can even get a pretty good stacktrace with Error.stack. It not part of the official web standard, but it works on all major browsers and that’s good enough. Once you’ve collected all data you want to log you can just send it to your server with an ajax request. Alternatively, you can use an <img> tag. Something like this works just fine:

let errimg = document.createElement('img');
errimg.src = '/jserror.png?e=' + encodeURIComponent(JSON.stringify(obj));
document.querySelector('body').appendChild(errimg);

One thing to watch out for is that GET requests can get truncated. You also want to make sure that you don’t log errors when you’re already in your error handler (otherwise you’ll DDOS yourself :)) and you probably want to drop errors you’ve already reported. Reporting an exception once per session is enough for debugging purposes.

What metadata you want to log is up to you, but we find it useful to log these things:

  • Username, account name. If you find a bug and fix it you want to tell people you fixed the bug, but you can’t do that if you don’t know which people got the error message.
  • Browser version. Helps when you want to replicate the bug. This was super important back in the IE6-9 days, when you had to make tons of browser-specific workarounds. Nowadays you mainly want to know if people are using a really old or unusual browser.
  • Javascript app bundle version and page load timestamp. Some people keep their browser open for weeks at a time and you don’t want to waste hours trying to replicate a bug that has been fixed ages ago.
  • Adblocker usage. Add a <div> with a bunch of spammy keywords to your page. Use setTimeout to check the boundingRect of that node a couple seconds after your page has finished loading. If the node is gone, you know they have an adblocker installed.

Be careful not to log anything that could contain customer data. Easier debugging is great, but not when you have to compromise your customer’s privacy to do it. It’s fine to log counts, IDs, and checksums. If you can’t figure out how to replicate the bug with only a stack trace to guide you then you can always add more asserts to your code and wait for one of them to trigger.

Assertions

To debug exceptions you only have a stack trace to work with. Debugging is a lot simpler when you make liberal use of assertions in your clientside code. You can use the same error logging code you use for exceptions, but asserts can log some extra diagnostics variables.

Usage tracking

Every time you add a new feature to your product you want to track if it gets used. If not, figure out why not. Is the feature too hard to discover? Do people just not care about it? Adding a tracking hook takes 1 minute, but the insights you get are invaluable.

Our rule of thumb: we get an email notification every single time a new feature is used. If the notifications don’t drive us nuts that means we built the wrong thing. This really helps us calibrate our intuition. And it’s motivating to see the notifications flow in right after you push to production!

You also want to track how often users get blocked by your software. Every time a user wants to do something but they get a “computer says no!” message they get a little bit unhappy with your software. They upload a file and it doesn’t work because the extension is wrong or the file is too large? Log it and fix the problem. Sometimes the fix can be as simple as telling users the file is too large before they have uploaded it. Instead of a simple “access denied” error see if you can make the error more helpful. You can add a button “ask administrator (name) for permission”. Measure which problems users run into fix them one by one.

Serverside

We take a whitelisting approach. We get email notifications about everything to start with. Then we add filters for all the errors we can’t do much about. Errors caused by connection timeouts, errors caused by virus scanner browser plugins, things like that. Every javascript exception potentially breaks your entire site for some users. That means every exception is worth investigating. You’ll inevitably discover your site breaks when an ajax POST times out, or when a dependency fails to load. Or when an adblocker removes some DOM nodes. No matter how well you test your software, your users will find creative ways to break it.

You can also use feature usage tracking for spam/fraud detection. If your SaaS service is inexpensive it will be used by credit card fraudsters to test if their stolen credit cards work. You can easily distinguish between real users and bots or fraud signups by comparing some basics statistics on feature usage and which buttons have been clicked on.

If you use a 3rd party service for error logging you can’t cross-reference data. You can’t easily discover which features get used by people who end up buying vs by trial users that fizzle out. If you have subscription data in one database and usage/error tracking in another database querying gets complicated, so you won’t do it.

Another reason why we want to do our own event logging is that we might accidentally log something that contains sensitive data. Our own logs rotate automatically, but 3rd party logging/event services will hang on to that data indefinitely.

Writing your own javascript error/event logging code isn’t much work and it will give you valuable insight in how people try to use your software and the bugs they run in to.

Typescript without Typescript

In some ways, Typescript is pretty awesome:

  • Typescript makes Javascript more strongly typed, which means you get to catch silly typos early. This is great.
  • Because of this typing information you can enjoy IDE advantages like autocompletion of object members, jumping to type definitions, or to function call sites. Nifty.
  • You can easily find unused code, and delete it confidently.
  • Refactoring code becomes way easier. Renaming identifiers is trivial, and when you really start to move code around Typescript is a real lifesaver. Those red squiggles turn an hour of tedious and maximum concentration refactoring work into a breezy 10 minute editing session.
  • Type inference means you don’t have to tediously define the type for every variable.

But Typescript is not without downsides:

  • You have to wait for compilation to finish every time you make a trivial change. Annoying on small projects, really annoying for bigger projects.
  • You get bloated Javascript code along with source maps for debugging. Extra layers of complexity that make debugging harder. If you want to debug an exception trace on a release server you now have to debug an ugly Typescript call stack.
  • Typescript includes Classes and Inheritance and other functionality that overlaps with modern ES6 Javascript. The additional features Typescript enables, like Class Interfaces and Enums, aren’t that compelling. The days of IE6 ECMAScript are long behind us. Modern Javascript is everywhere it’s a pretty good language that doesn’t need Typescript extensions.

What if you could get almost all the benefits of Typescript without Typescript? Turns out that you can. The trick? You just enable typescript mode in VSCode for plain ES6 Javascript projects. I just assumed that Typescript would only do typescript-y things for Typescript projects, but that’s not the case!

The trick is to add a jsconfig.json file to your project, that looks something like the one below. The “checkJS” property is the magic one that gets you 90% of Typescript in your ES6 projects. In my case, I’ve also added some extra type libraries like “ES2021” and “ESNext” (I’m not sure you actually need to declare both). Turns out Typescript otherwise doesn’t know functions like Array.at that are already pretty widely supported in browsers.

My jsconfig.json

{
    "compilerOptions": {
        "target": "ES6",
        "checkJs": true,
        // Tells TypeScript to read JS files, as
        // normally they are ignored as source files
        "allowJs": true,
        "lib": ["ES6", "DOM", "ES2021", "ESNext"],
        "alwaysStrict": true,
        // Generate d.ts files
        "declaration": true,
    }
}

The benefits of typescript without typescript, visualized:

A few limitations

  • Sometimes you have to nudge typescript into interpreting types correctly with JSDoc type annotations. You can define nullable types /** @type {MaybeMyClass?} */, type unions, for example if a variable is either a bool or a string: /** @type {boolean|string} */. Usually VSCode will suggest the correct annotation via call site type inference.
  • No template types or other advanced stuff. I don’t think they’re worth much anyway.
  • When Typescript gets in your way you can just ignore it, so really, you get almost all the upside with none of the downside.

In conclusion

Maybe none of this is news to you. In that case, sorry to disappoint. However, if you have never experienced Typescript error checking, refactoring, and navigation tooling in an ordinary and plain Javascript project you’ve got to try it. It doesn’t happen often that a piece of tech turns out to be way better than expected, but this is one of those cases. Typescript without Typescript is amazing and I’m sticking with it.

The advantages of developing in a dev VM with VSCode Remote

Now that we’re both working on a lot of code, need to keep track of versions, and also need to start working on a backend, it’s time to set up our development environment.

Advantages of doing all development in a local VM

All our source code will be stored on our Git server. Locally we both use a development Virtual Machine (VM) running on our laptop/PC, on which we will check out the (mono) source repository. We will use ES6 for the frontend and python3/Django for the backend, but this works pretty much for any stack. Using a local development VM has several advantages:

  • We’ll both have identical set-ups. Diederik uses Windows most of the time, I use a Mac machine. It would become a mess if we tried to work with all kinds of different libraries, packages and framework versions.
  • Easy to create backups and snapshots of the entire VM, or transfer the entire development setup to a different machine (like in case of any coffee accidents).
  • It avoids the mess of having to install packages on our local PCs and resolving conflicts with the OS. For example, the Python version on my macOS is ancient (and even if it wasn’t, it’s probably not the same as on the production server). Trying to override OS defaults and mess with package managers like brew is a mess in practice. It’s slow, breaks things all the time and adds a lot of extra friction to the dev stack.
  • Not only do we avoid local package managers, but also the need for other tools in the stack like Python’s virtualenv. We don’t have different virtualenvs, only the env, which is the same on our VM as on the production server.
  • So not only will the packages be the same between our development environments, they will even be identical to the eventual production server (which we don’t have yet, we will have to set one up later). This way we don’t need anything like a staging server. Except for having virtual hardware, debug credentials and test data, the development VM will mimic the complete CALM production stack.
  • Because of built-in support for remote development in VSCode (which is still local in this case, but on a local VM), all VSCode plugins are going to run with exactly the language and package versions we want. No mess trying to configure Django and Python on macOS with a different OS base install. All plugins will run on the VM, so we’ll also have IntelliSense code completion for all our backend packages and frontend parts in our stack.
  • That also means that we can not only debug issues in the app, but issues in the stack as well, from nginx web server config to websocket performance.

Setting up the VM

I lile to use vagrant to easily create and manage virtual machines (which you can use with different providers such as VMWare or VirtualBox). To set up a new Debian Linux based VM:

# see https://app.vagrantup.com/debian
pc$ vagrant init debian/bullseye64
pc$ vagrant up
pc$ vagrant ssh 
# now you're in the VM!

In the resulting Vagrantfile you can set up port forwarding, so running a Django development server in your VM will be accessible on the host PC.

Because vagrant ssh is slow, you can output the actual config to ssh into your machine using

pc$ vagrant ssh-config

and then store this in ~/.ssh/config (on the local PC), so it looks something like this:

Host devvm
  HostName 127.0.0.1
  User vagrant
  Port 2020
  UserKnownHostsFile /dev/null
  StrictHostKeyChecking no
  PasswordAuthentication no
  IdentityFile /Users/wim/devvm/.vagrant/machines/default/virtualbox/private_key
  IdentitiesOnly yes
  LogLevel FATAL

To make sure we both have the same packages installed on our VMs (and server later on), we usually create Ansible playbooks (or just a simple bash script when it’s a few packages and settings). We also store our infrastructure config in git, but we’ll go into all of that some other time.

For now, we can just use a very short script to install the packages for our stack:

vm$ apt-get install aptitude && aptitude update && aptitude full-upgrade
vm$ aptitude install python3-pip python3-ipython sqlite3 git
vm$ pip install Django==3.2.12

Now we just need to add our git credentials in the VM’s ~/.ssh/config:

Host thegitserver
  HostName thegitserver.example.com
  User gituser
  ForwardAgent yes
  IdentityFile ~/.ssh/mygit_id

and check out the repository on the VMs drive:

vm$ mkdir project && cd project
vm$ git clone ssh://thegitserver/home/gituser/project.git

Remote VSCode

Now that all the packages and sources are on the VM, we can set up VSCode on our local machine to work on our workspace on the VM and run extensions on the VM as well (see VSCode’s Remote Development using SSH).

1- Simply install the Remote – SSH extension:

2- Open the Command Palette, and >ssh should show the option Remote-SSH: Connect to Host.

3- Select that, and it should show the Vagrant’s SSH config we saved in our PC’s ~/.ssh/config earlier under the name devvm.

4- You’ll see we’re now connected to the devvm. Click Open Folder to open the remote workspace, ~/project in our example.

5 – The last step is ensuring all the extensions we need are installed to the VM. Click on the Extensions tab, look for the extensions you want, and click “Install in SSH”

6 – That’s it! In the screenshot you can now see the plugins are installed on the VM, the repository workspace from the VM is opened as our current project, and git integration works out of the box.

We can even use extensions like the Live Server on our ES6 frontend code like before, and run our Django API development server on the VM knowing we have all the correct packages.