Now that we’re both working on a lot of code, need to keep track of versions, and also need to start working on a backend, it’s time to set up our development environment.
Advantages of doing all development in a local VM
All our source code will be stored on our Git server. Locally we both use a development Virtual Machine (VM) running on our laptop/PC, on which we will check out the (mono) source repository. We will use ES6 for the frontend and python3/Django for the backend, but this works pretty much for any stack. Using a local development VM has several advantages:
- We’ll both have identical set-ups. Diederik uses Windows most of the time, I use a Mac machine. It would become a mess if we tried to work with all kinds of different libraries, packages and framework versions.
- Easy to create backups and snapshots of the entire VM, or transfer the entire development setup to a different machine (like in case of any coffee accidents).
- It avoids the mess of having to install packages on our local PCs and resolving conflicts with the OS. For example, the Python version on my macOS is ancient (and even if it wasn’t, it’s probably not the same as on the production server). Trying to override OS defaults and mess with package managers like brew is a mess in practice. It’s slow, breaks things all the time and adds a lot of extra friction to the dev stack.
- Not only do we avoid local package managers, but also the need for other tools in the stack like Python’s virtualenv. We don’t have different virtualenvs, only the env, which is the same on our VM as on the production server.
- So not only will the packages be the same between our development environments, they will even be identical to the eventual production server (which we don’t have yet, we will have to set one up later). This way we don’t need anything like a staging server. Except for having virtual hardware, debug credentials and test data, the development VM will mimic the complete CALM production stack.
- Because of built-in support for remote development in VSCode (which is still local in this case, but on a local VM), all VSCode plugins are going to run with exactly the language and package versions we want. No mess trying to configure Django and Python on macOS with a different OS base install. All plugins will run on the VM, so we’ll also have IntelliSense code completion for all our backend packages and frontend parts in our stack.
- That also means that we can not only debug issues in the app, but issues in the stack as well, from nginx web server config to websocket performance.
Setting up the VM
I lile to use vagrant to easily create and manage virtual machines (which you can use with different providers such as VMWare or VirtualBox). To set up a new Debian Linux based VM:
# see https://app.vagrantup.com/debian
pc$ vagrant init debian/bullseye64
pc$ vagrant up
pc$ vagrant ssh
# now you're in the VM!
In the resulting Vagrantfile you can set up port forwarding, so running a Django development server in your VM will be accessible on the host PC.
Because vagrant ssh is slow, you can output the actual config to ssh into your machine using
pc$ vagrant ssh-configand then store this in ~/.ssh/config (on the local PC), so it looks something like this:
Host devvm
  HostName 127.0.0.1
  User vagrant
  Port 2020
  UserKnownHostsFile /dev/null
  StrictHostKeyChecking no
  PasswordAuthentication no
  IdentityFile /Users/wim/devvm/.vagrant/machines/default/virtualbox/private_key
  IdentitiesOnly yes
  LogLevel FATAL
To make sure we both have the same packages installed on our VMs (and server later on), we usually create Ansible playbooks (or just a simple bash script when it’s a few packages and settings). We also store our infrastructure config in git, but we’ll go into all of that some other time.
For now, we can just use a very short script to install the packages for our stack:
vm$ apt-get install aptitude && aptitude update && aptitude full-upgrade
vm$ aptitude install python3-pip python3-ipython sqlite3 git
vm$ pip install Django==3.2.12
Now we just need to add our git credentials in the VM’s ~/.ssh/config:
Host thegitserver
  HostName thegitserver.example.com
  User gituser
  ForwardAgent yes
  IdentityFile ~/.ssh/mygit_id
and check out the repository on the VMs drive:
vm$ mkdir project && cd project
vm$ git clone ssh://thegitserver/home/gituser/project.git
Remote VSCode
Now that all the packages and sources are on the VM, we can set up VSCode on our local machine to work on our workspace on the VM and run extensions on the VM as well (see VSCode’s Remote Development using SSH).
1- Simply install the Remote – SSH extension:

2- Open the Command Palette, and >ssh should show the option Remote-SSH: Connect to Host.
3- Select that, and it should show the Vagrant’s SSH config we saved in our PC’s ~/.ssh/config earlier under the name devvm.
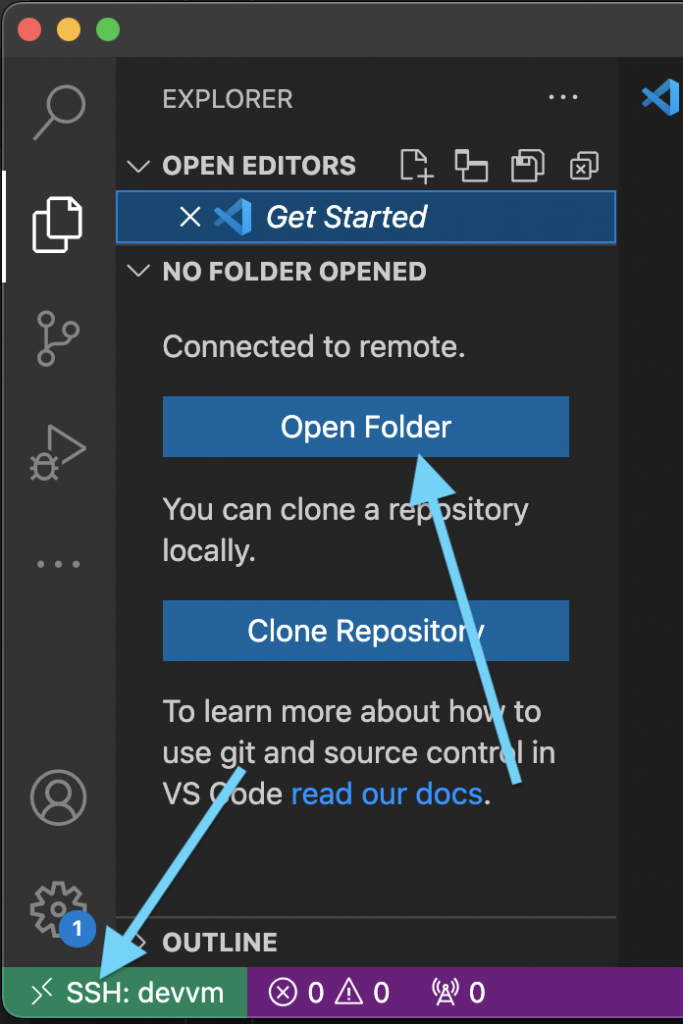
4- You’ll see we’re now connected to the devvm. Click Open Folder to open the remote workspace, ~/project in our example.

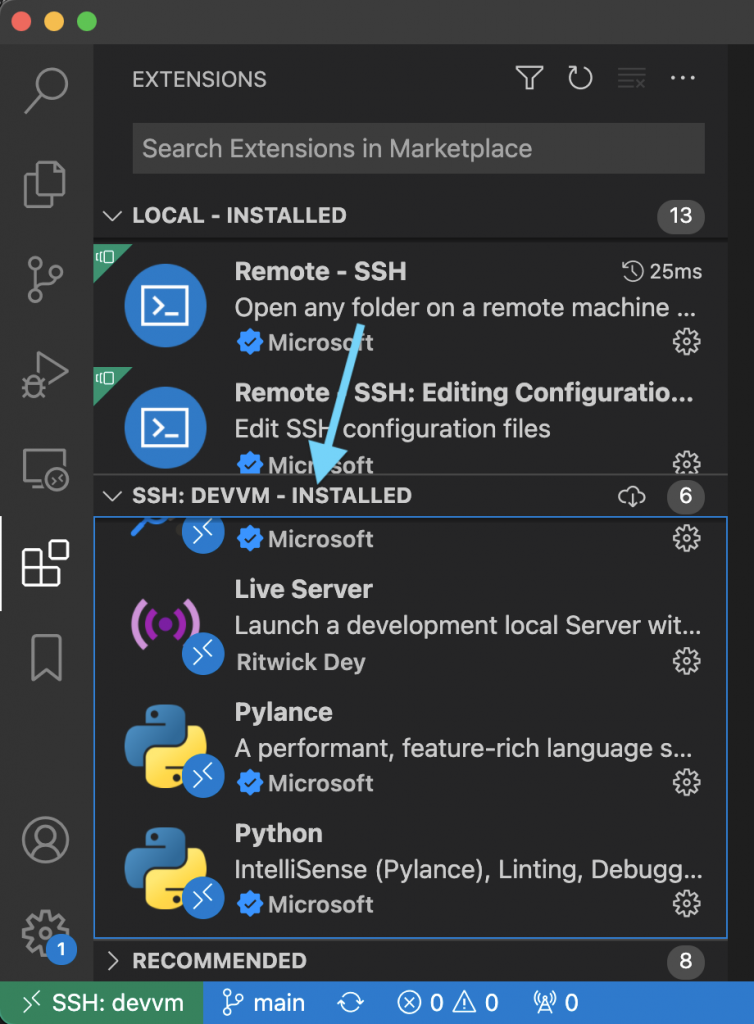
5 – The last step is ensuring all the extensions we need are installed to the VM. Click on the Extensions tab, look for the extensions you want, and click “Install in SSH”

6 – That’s it! In the screenshot you can now see the plugins are installed on the VM, the repository workspace from the VM is opened as our current project, and git integration works out of the box.

We can even use extensions like the Live Server on our ES6 frontend code like before, and run our Django API development server on the VM knowing we have all the correct packages.

